
© Ali AlSaibie, PhD.
© Ali AlSaibie, PhD.
In this prelab, we will go through the steps of creating a new project for the ST Nucleo F401RE board using the Arduino framework. Then we will try a few basic code routines to familiarize ourselves with the Arduino framework.
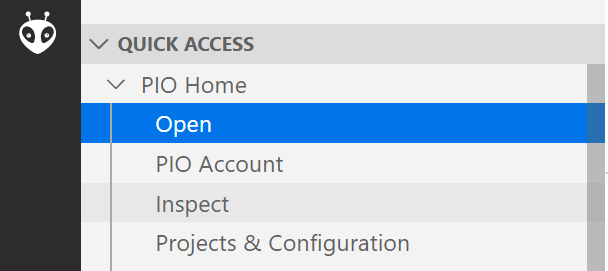
- Open the PlatformIO tab, if it is not open, click on the bug symbol and double click on Open under PIO Home
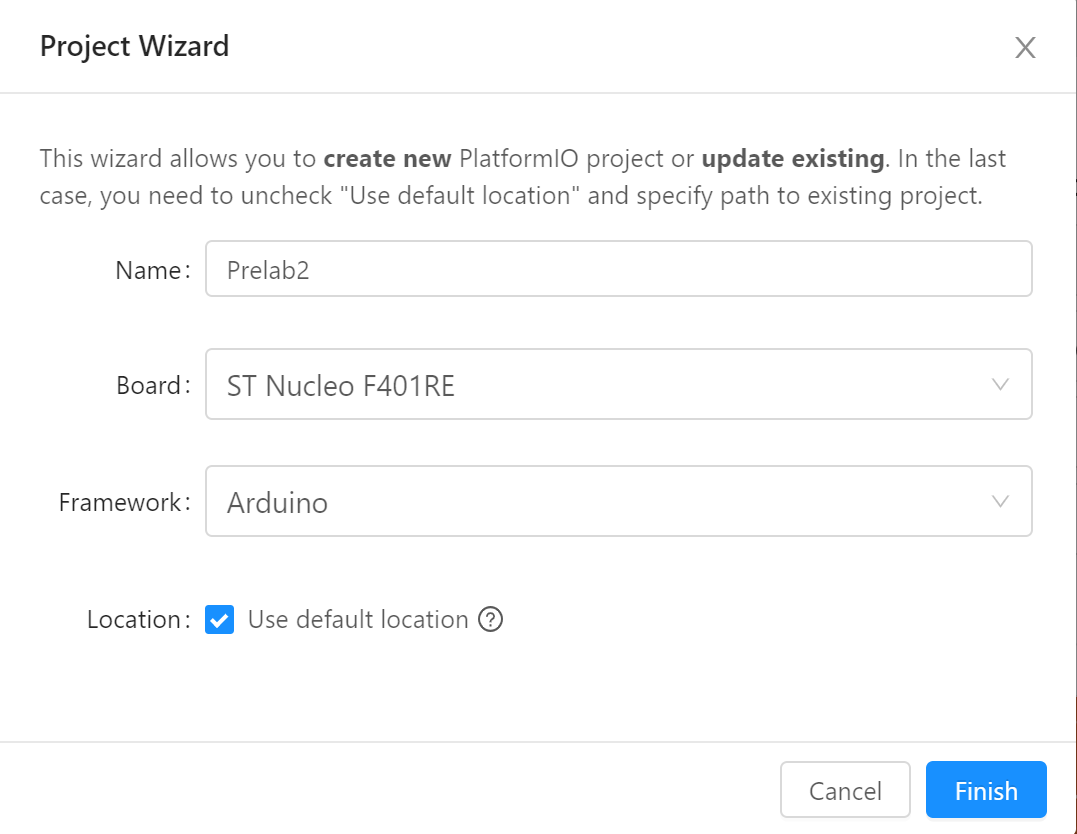
- On the PlatformIO page, select New Project. Choose a name for your project (e.g. PreLab2), in the board field, choose the board we are using: if you start typing F401RE you should get : ST Nucleo F401RE, that’s the board we are using. Then, in the framework field, select Arduino. Hit Finish.
A new project will be created, including a template main.cpp file under src folder.
Blinky
Let’s try to blink the built-in LED. Copy the below code into main.cpp.
#include <Arduino.h> /* This include brings all the arduino magic */

void setup() { /* This function gets called once when the mcu boots up */
/* pinMode is an arduino function that sets a pin is input or output */
  pinMode(LED_BUILTIN, OUTPUT);
}

void loop() {
/* This is an infinite while loop, repeats as long as the mcu is on */
  digitalWrite(LED_BUILTIN, HIGH);   /* Set the STATE of the pin HIGH */
  delay(500);              /* Pause the loop for 500ms = 0.5s */
  digitalWrite(LED_BUILTIN, LOW);     /* Set the STATE of the pin LOW */
  delay(500);
}
First test that the code compiles, by clicking on the check button at the status bar. If successful you can now build and flash the code into the microcontroller.

Click the arrow button, the code will compile and PIO will attempt to flash the program code into the microcontroller. Ensure that the microcontroller is connected to the PC via USB first.
If successful, the built-in led will start to flash at a frequency of 1Hz. Play around with the blinking frequency, reflash and observe what happens.
Congratulations, you’ve completed your first microcontroller program.
Control the LED with the Onboard Switch
Onboard the NUCLEO board, we have a built-in switch as well. This switch is connected to pin x. We can use this switch to control the state of the LED. Copy over the following code and flash it to the microcontroller.
#include <Arduino.h>

void setup(){
  pinMode(LED_BUILTIN, OUTPUT);
  /* USER_BTN is a macro for the pin number connected to the switch */
  pinMode(USER_BTN, INPUT);
}

void loop(){
  /* digitalRead() gives us 1 or 0, the button on the Nucleo is connected
  *  in negative logic (Button Pressed = Low = 0)
  *  We switch the LED on if the button is pressed, turn LED off otherwise
  */
  if (!digitalRead(USER_BTN)){
    digitalWrite(LED_BUILTIN, HIGH);
  }
  else{
    digitalWrite(LED_BUILTIN, LOW);
  }
}
Transmitting Characters from MCU to PC
The Arduino framework has support for the various communication protocols onboard modern microcontrollers, including the UART protocol, which is used to communicate to the PC (by way of USB communication). Serial is a predeclared class object in the Arduino framework. It holds some neat communication functionalities, including setting speed, sending and receiving.
Copy over the following code and flash it to the microcontroller.
#include <Arduino.h>

int counts = 1;
void setup(){
    /* Serial is pre instantiated class object, it holds communication
     * functionalities through the USART periphral, connected over the virtual COM port
     */
    Serial.begin(9600); /* We call begin to enable the peripheral and set the comms speed */
}

void loop(){
    delay(1000);
    Serial.print("Hi: "); /* We can print strings through the serial object */
    Serial.print(counts); /* We can print numbers through the serial object */
    Serial.println(" Times"); /* println adds a "new line" character to the stream */
    counts++;
}
Then press on the button with the plug icon to open a serial communication terminal. This terminal connects to the communication port of the microcontroller and prints received output.
Sending and Receiving Characters between MCU and PC
You can also send characters through the terminal. Let’s see how you can echo back a character you sent through the terminal. Copy over the following code and flash it into the microcontroller, then open a terminal instance if it is not open already.
#include <Arduino.h>

void setup(){
    Serial.begin(9600);
}

void loop(){
    /* Serial.available() returns the number of UNREAD characters in the buffer */
    if(Serial.available() > 0 ){
        char c = Serial.read(); /* Reads one character from the buffer */
        Serial.print("Sent: ");
        Serial.println(c);/* Send back the read character */
    }
}
Useful Keyboard Shortcuts for PlatformIO
To find all default keyboard binding for PlatformIO on VSCode. Go to File->Preferences->Keyboard Shortcuts. Type PlatformIO in the search bar of the keyboard shortcuts tab and you will get a filtered list of the PlatformIO keyboard binding:
Build the Program (The check button): CTRL+ALT+B
Upload the Program (The arrow button): CTRL+ALT+U
Open Serial Terminal (The plug button): CTRL+ALT+S