
© Ali AlSaibie, PhD.
© Ali AlSaibie, PhD.
Please review Part I Lecture 8 Communication before attempting this prelab.
In this prelab, we will become familiar with using the serial communication functionalities through the Arduino API and then learn how to interface between the PC and MCU by running a MATLAB script that connects to our microcontroller through serial communication.
We will also introduce a method for serializing data across devices. Specifically, we will use the JSON serialization which is widely supported across many programming languages.
Create a PlatformIO project for Nucleo STM32F401RE with the Arduino framework. Name it Prelab5, preferably.
Note the addition of the monitor_speed flag. This sets the baud rate for the serial terminal on the PC side.
[env:nucleo_f401re]
platform = ststm32
board = nucleo_f401re
framework = arduino
src_filter = -<main*.cpp> +<mainE1.cpp>
monitor_speed = 9600 ; Default value is 9600The first example shows two ways you can read and echo characters between two devices connected through the serial (UART) port using the Arduino Serial library. Note that you can choose to work with character arrays or Strings. Character arrays consume less overhead if speed/space is of concern.
#include <Arduino.h>

void setup() {
    Serial.begin(9600);  // opens serial port, sets data rate to 9600 bps
}

void loop() {
    // send data only when you receive data:
    if (Serial.available() > 0) {
        static int alternate = 1;
        /* In both methods, the read calls are termed "blocking", they block the
         * code from continuing until condition is satisfied */
        if (alternate == 1) {
            // read the incoming byte:
            char incomingBytes[200] = {0};
            Serial.readBytesUntil('\n', incomingBytes, 200); /* This blocks until \n is received or 200 characters read */
            // say what you got:
            Serial.print("Character Array: ");
            Serial.println(incomingBytes);
            alternate = 0;
        } else {
            String string_received = Serial.readStringUntil('\n'); /* This also blocks until \n is received */
            Serial.print("String: ");
            Serial.println(string_received);
            alternate = 1;
        }
    }
}
In this first case, we create a character array of size 200, then pass the character array pointer to the function Serial.readBytesUntil() and specify that it should read characters until a new line terminator is read, or that 200 characters have been read.
The following is the implementation of the function in the arduino Stream.cpp file.
size_t Stream::readBytesUntil(char terminator, char *buffer, size_t length)
{
  if (length < 1) {
    return 0;
  }
  size_t index = 0;
  while (index < length) {
    int c = timedRead();
    if (c < 0 || c == terminator) {
      break;
    }
    *buffer++ = (char)c;
    index++;
  }
  return index; // return number of characters, not including null terminator
}
In the second case we are requesting a String type object. The string object will expand to fit the length of the character array received. This is the implementation of the Serial.readStringUntil() function from the arduino Stream.cpp file.
String Stream::readStringUntil(char terminator)
{
  String ret;
  int c = timedRead();
  while (c >= 0 && c != terminator) {
    ret += (char)c;
    c = timedRead();
  }
  return ret;
}In example 2, a few different methods for printing data through the Arduino Serial library are given. Note that the baud rate set in this example is 1Mbps, so you will need to change the monitor_speed to 1000000 before opening it.
#include <Arduino.h>

void setup() {
    Serial.begin(1E6);  // opens serial port, sets data rate to 1Mbps
}

void loop() {
    /* Several Ways of printing */
    /* Print a character array with a new line character */
    Serial.print("Line: 1\n");

    /* Print a character array with a new line character through function */
    Serial.println("Line: 2");

    /* Print a number in hex format */
    Serial.print("Line: ");
    Serial.println(3, HEX);

    /* Print an sprintf array %d or %i for int */
    char buffer[20];
    sprintf(buffer, "Line: %d + %i", 2, 2);
    Serial.println(buffer);

    /* Print using Strings (C++ way) */
    Serial.println((String) "Line: " + 5.0f);

    delay(1000);
}In this and the following example, we will not use the serial monitor inside VSCode, instead, we will use MATLAB to interface with the microcontroller.
#include <Arduino.h>
void setup() {
Serial.begin(1E6); // opens serial port, sets data rate to 1Mbps
}
void loop() {
if (Serial.available() > 0) {
// read the incoming number:
uint8_t incomingnumber = Serial.read();;
// echo it
Serial.print("Got: ");
Serial.println(incomingnumber);
}
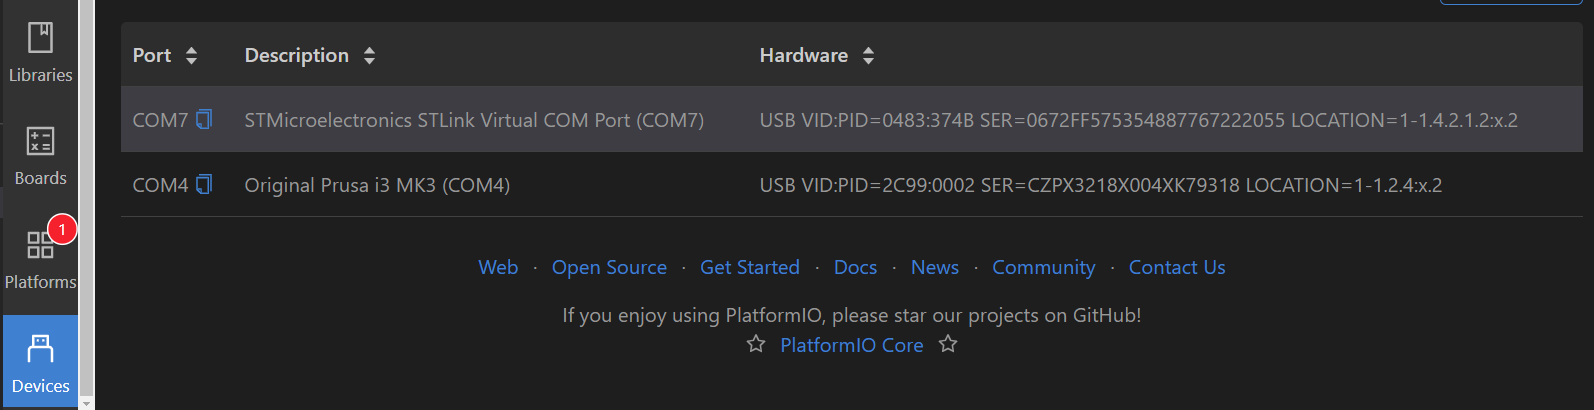
}You will use a MATLAB script: Prelab5Client.m to send and print echoed numbers. After flashing mainE3.cpp into the microcontroller. First check the COM port number under PlatformIO->Devices and update the MATLAB script COM port number before running it. The microcontroller should be the STMicroelectronics... device. Here, the COM port is 7.
Prelab5ClientE3.m %% Clear Open Ports - Might Crash Other Serial Devices
% When you open a COM port, you need to close it properly.
% When we terminate a script we often don't close the port
% properly, so we need to scan open ports and close them here.
% A proper script would use a try-catch
if ~isempty(instrfind)
fclose(instrfind);
delete(instrfind);
end
%%
% Relace COM6 with the port number of the connected mcu, you can find the
% port number from PlatformIO's home page, under Devices
mcuCom = serial('COM6','BaudRate',1000000);
% Open the serial port as a file descriptor - then treat it as a
% file-access
fopen(mcuCom)
% If the device was sending prior to connection, we want to throw away old
% buffered data and grab the latest only. So we flush
flushinput(mcuCom)
% Send a stream of characters to the microcontroller
a = 0:50;
for k = 1:length(a)
% By default, fwrite sends ASCII characters, but we can specify specific
% data types
fwrite(mcuCom,a(k), "uint8");
pause(0.01);
% Grab back the echoed number
readline = fgetl(mcuCom);
disp(readline);
end
% Close the port properly at the end
fclose(mcuCom);
delete(mcuCom);When you execute the MATLAB script Prelab5ClientE3.m, the MATLAB script will send the number 1 to 50 and the MCU will echo them back and MATLAB will display the echoed numbers. Note the baud rate set in the microcontroller code and match the baud rate with the MATLAB script.
MATLAB has built-in support for serial communication. You can supply it the COM port on which the MCU is connected and specify the baud rate. It will return an object you can treat as a file object.
mcuCom = serial('COM6','BaudRate',1000000);You can open, flush, write characters and lines to it and get characters and lines from it. You can also close the communication and delete the object so that you can re-instantiate it.
In this example, we will use a message serialization protocol to exchange data between to devices (PC-MCU). There are number of serialization protocols available, but we will use JSON, which stands for JavaScript Object Notation. A serialization protocol allows for a better structured data formatting.
So, instead of making up your own set of sequenced and separated characters and then parsing them on the other end. Which might be sufficient for a few commands, it soon becomes tedious to manage once the messages become varied and complex. A serialization protocol can help manage this issue. Serialization also helps in passing messages between programs of different languages, since the serialization protocol can be language agnostic.
MATLAB supports JSON from version 2016b and above. On the Arduino side, you need to download the ArduinoJSON library. This can be done through the PlatformIO plugin home page in VSCode, or you can specify the library dependency in the platform.ini file directly as such
[env:nucleo_f401re]
platform = ststm32
board = nucleo_f401re
framework = arduino
src_filter = -<main*.cpp> +<mainE4.cpp>
monitor_speed = 1000000 ; Default value is 9600
lib_deps = bblanchon/ArduinoJson @ ^6.17.3 ; Specifying versions can be handy in maintaining compatibility of projects
Once installed, you only need to include the header <ArduinoJson.h> as is done in mainE4.cpp
#include <Arduino.h>
#include <ArduinoJson.h> /* Add JSON Support */

void setup() {
  // Initialize Serial port
  Serial.begin(250000);
  while (!Serial) continue;
}

void loop() {
  static int counter = 0;
  StaticJsonDocument<200> doc;
  // Add values in the document
  doc["sensor"] = "MagicSensor";
  doc["time"] = millis();
  // Add an array.
  JsonArray data = doc.createNestedArray("data");
  data.add(cos(counter*2*PI / 600 ));
  data.add(sin(counter*2*PI / 600 )); /* Basic Sinusoidal Function */
  counter++;
  // Generate the minified JSON and send it to the Serial port.
  serializeJson(doc, Serial);

  /* At the end, we send a new line character to denote line termination */
  Serial.println();
  delay(50);

}
The way JSON works is by structuring the message in a specific format. In our example We want to create a json "struct" object that looks like this
JSONdata = {
String sensor
Int time
float data[2]
}
Such that on the receiving side, if we want to access the member sensor we would address JSONmessage.sensor, or to access the data we would address JSONmessage.data(1), JSONmessage.data(2). Note that indexing is language dependent.
The JSON object, in our specific example, would create a character array that looks exactly like this:
{\"sensor\":\"MagicSensor\",\"time\":475100,\"data\":\[0.518027,-0.855364\]}Which is also human-readable before it is parsed. Other serialization protocols may convert the message into a series of unreadable characters.
Once you flash mainE4.cpp into the microcontroller, run the Prelab5ClientE4.m MATLAB script and you should see a plot animation of two sinusoidal functions. Remember to match the baud rates between the microcontroller and MATLAB script.
%% Clear Open Ports - Might Crash Other Serial Devices
if ~isempty(instrfind)
     fclose(instrfind);
     delete(instrfind);
end

%%
% Create Serial Object
mcuCom = serial('COM6','BaudRate',250000);
fopen(mcuCom);
counter = 0;

% Animated Line Plot
h1 = animatedline('LineWidth', 2, 'color', 'red', 'LineStyle', ':',...
    'MaximumNumPoints',600);
hold on
h2 = animatedline('LineWidth', 2, 'color', 'blue', 'LineStyle', ':',...
    'MaximumNumPoints',600);
axis([0,400,-1,1]); grid on;
xlabel('Time(s)')
setylabel = false;

% Flush First Line
flushinput(mcuCom)

while(1)
 if(~ishghandle(h1))
     delete(h2);
    break;
 end
 % Read Incoming Data and Print
 if (get(mcuCom, 'BytesAvailable') > 0)
     readline = fgetl(mcuCom);
     % readline = {"sensor":"MagicSensor","time":475100,"data":[0.518027,-0.855364]}
     % MATLAB has built-in json support
     dataJSON = jsondecode(readline);
     addpoints(h1,dataJSON.time/1000,dataJSON.data(1));
     addpoints(h2,dataJSON.time/1000,dataJSON.data(2));

     drawnow limitrate; % Faster animation
     % Moving Axes [xmin xmax ymin ymax]
     axis([dataJSON.time/1000-10 dataJSON.time/1000+10 -1.1 1.1])

     if(~setylabel)
     ylabel(dataJSON.sensor);
     setylabel = true;
     end

 end
end

% We don't reach here...
fclose(mcuCom);
delete(mcuCom);
Make sure to check that the COM port is correct. And the baud rates match on both the PC and MCU side. Make sure that no other serial terminal is connected to the MCU before connecting through MATLAB.
A Julia script is also provided.
using Revise
using Plots
using LibSerialPort
using JSON3
gr()
##

function serialplotting()
    global mcuCom
    time_zero = 0
    sample_no = 0

    # Empty the receive buffer
    flush_line = flush(mcuCom)

    # Create a base plot
    plt = plot([0], [[0],[0]], linewidth=2, label=["Data 1" "Data 2"])
    ylims!((-1.5, 1.5))
    display(plt)

    while true
        # Since Julia takes a while to precompile, the receive buffer gets overloaded,
        # flush it if its big. Keep data coming in real-time
        if bytesavailable(mcuCom) > 800
            println("Flushing Serial")
            flush(mcuCom)
        end

        if bytesavailable(mcuCom) > 0
            mcu_message = readuntil(mcuCom, '\n')
            global jsonline = ""

            try
                jsonline = JSON3.read(mcu_message)

                if sample_no == 0
                    # Grab the first millis, reference time w.r.t
                    time_zero =  jsonline.time;
                end

                sample_no += 1

                # Offset time and convert to seconds
                time = Float64(jsonline.time - time_zero) / 1000

                # Push points to plot lines
                push!(plt, 1, time, jsonline.data[1])
                push!(plt, 2, time, jsonline.data[2])
                # Alternative method
                # push!(plt, time, [jsonline.data[1], jsonline.data[2]])

                xlims!((time - 20, time + 10)) # Shift x-axis
                gui(); # refresh plot

                # Print a status message every once in a while, this also allows for capturing CTRL+C
                if mod(sample_no, 20) == 0
                    println("Running - Hold CTRL+C to Terminate")
                end

            catch e
                println("JSON parsing or plot update error")
            end
        end
    end
end

# Use try-finally to properly close the serial port after program termination
try
    global mcuCom = open("COM7", 250000); # TODO: Change COM port and baud rate to reflect that
    serialplotting()
finally
    println("Exiting and Closing Serial Port")
    closeall()
    close(mcuCom)
end