
© Ali AlSaibie, PhD.
© Ali AlSaibie, PhD.
In the previous lab, we introduced digital filter design and analysis offline. In this lab we will apply a digital filter on real sensor values. In this prelab, we will explore the data from the sensor expansion board and learn how to log the sensor data for offline processing.
MATLAB v 2016b or higher, with DSP or Signal Processing Toolbox andControl System Toolbox
STM32 Nucleo F401R
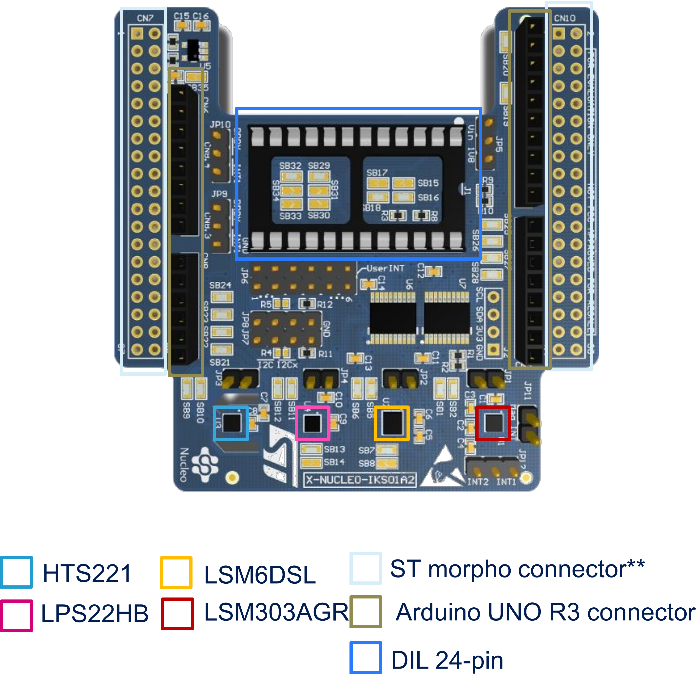
IKS01A02 Expansion Board
Download the Prelab 7 Project, it contains both the PlatformIO project and the MATLAB script files (under script folder)
Add the IKS01A02 expansion board onto your Nucleo board. The expansion board (or shield) connects via the Arduino headers. It only uses a few pins for power and I2C connection, the rest of the pins are passed through the headers on the expansion board itself.
We will look at the data coming from the Accelerometer, Gyroscope, Magnetometer, Pressure Sensor and Humidity & Temperature Sensor respectively. Then discuss how the data can be logged from the PC side for offline analysis.
The communication with all of the sensors in this lab is done via the I2C serial communication protocol. The Arduino framework includes methods for I2C communication through the Wire.h protocol.
#define DEV_I2C WireThere are two accelerometers on the expansion board, one on the LSM6DSL sensor and another on LSM303AGR sensor. We are using the accelerometer on the LSM6DSL sensor.
Compile and run mainE1ACC.cpp, then connect the serial terminal and observe the data from the accelerometer. Rotate the board in the x, y and z direction and observe the change in values. When the board is placed upright on a table the z axis should read close to (), if the board is flipped face down, the z-axis accelerometer axis should read close to .
There is a library provided for each of the sensors on the expansion board. The sensor libraries are wrapped in C++ classes. They each require that the I2C device pointer is passed to them on construction.
LSM6DSLSensor *AccGyr; // A pointer to the Accelerometer class objectThe sensor libraries take care of configuring and communicating with the sensors. Externally, you only need to call a few number of methods
When creating the sensor object, you need to pass it the I2C device pointer.
AccGyr = new LSM6DSLSensor(&DEV_I2C); // Creating a new instance and passing a pointer to the I2C deviceSome routines may need to be done, including configuring the sensor and that's wrapped in the enable function of the sensor object.
AccGyr->Enable_X(); // Enable AccelerometerTo get a new sample from the sensor, you can pass pointer to an array of 3 elements, that will be filled with the sensor data.
For the LSM6DSL sensor, we can grab the accelerometer or gyroscope data. Here we grab the accelerometer data.
int32_t acc_data[3];
AccGyr->Get_X_Axes(acc_data);
The same concept applies to the other sensor libraries as well.
Compile and run mainE2GYRO.cpp. Observe the data from the terminal and rotate the board with different angular rotation rates, and observe the values. You can change the delay value in the code to reduce the rate at which data is being printed.
Compile and run mainE3MAG.cpp and observe the output values on the terminal. The values should be printed in . Rotate the board in Yaw motion and align the front of the board with magnetic north direction and note the x-axis Magnetometer value. Use a compass app on your phone to compare. Then with the board front pointing North, pitch the board up and down and notice the Magnetometer x-axis value. You will notice that even though the x-axis is in the same plane along the north direction, the value changes.
To maintain the correct compass reading when you pitch the sensor, you need to employ the accelerometer data and peform Tilt Compensation. This is done when using magnetometers in devices that rotate in 3D space such as multirotors.
Compile and run mainE4BAR.cpp and mainE5HUMTEMP.cpp to observe the pressure and, temperature and humidity, respectively. Pressure is provided in units of , temperature in and humidity in relative .
Move the board up and down a different of at least one meter difference and observe the change in values Place your finger on the Humidity and Temperature chip, and observe he change in temperature and humidity.
A MATLAB function and script are provided under scripts folder which you can use to log the sensor data through the terminal. Ensure that the serial terminal is closed on VSCode, and in MATLAB. Inspect LogIKS01A02.m and run it to log sensor data. Note that the latter script calls the function DataLog, you can pass different port, baudrate, # of samples and output file name.